

Readers and Writers
A Reader is an FME term for the object in a translation that reads a source dataset and a Writer is the FME term for the object in a translation that writes to a destination dataset.
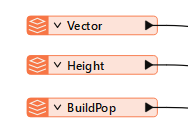
Each representation in the Navigator is either a Reader or a Writer, as shown here:

There is a distinction between Readers/Writers and Datasets because many FME translations work on multiple datasets.
Adding Readers:
We can add one reader, or specify multiple datasets to include as multiple readers.
Steps
- Select Readers > Add Reader. Alternatively, use Quick Add.
- Browse to the dataset file (or group of files) that you want to add. FME can usually determine the format from the file extension, and will automatically populate the Format field.
- Specify parameters and coordinate system (if applicable).

Workflow options determine the number of feature types that will be displayed on the canvas. Selecting either one will not affect the outcome of the workspace: these options determine only how the feature types appear on the canvas, and how they are interpreted within the workspace.
By default, the Individual Feature Types option will be selected. This means that for every feature type in the dataset (assuming there is more than one), Workbench will display a corresponding feature type on the canvas. This has always been the default workflow for Workbench and for most workspaces, this option is sufficient.
If, however, we want to display only one feature type on the canvas, we can select Single Merged Feature Type. All feature types in the source dataset are merged into one single feature type.
4. Initiating the Action: After we press OK, the log window will display processing information, and the feature types will appear in the reader area of your workspace.

Adding Multiple Readers
Adding Multiple Readers
There are a few ways that you can create a workspace with multiple readers.
If readers are the same format and schema:
There are a few ways that you can create a workspace with multiple readers.
If readers are the same format and schema:
You can add datasets of the same format and with the same schema (data model) to any source dataset you have already defined in your workspace. These datasets will be merged together when you run the translation. For formats that support coverages, you can also add folders and subfolders.
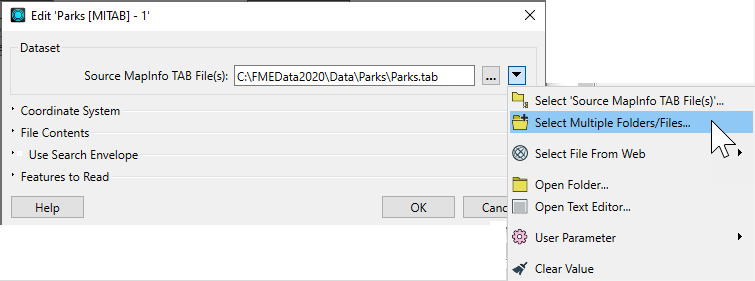
Double-click the dataset name in the Navigator.
In the Edit User Parameter dialog, you can manually enter a path to a file, or multiple files (for example, *.tab). You can also add multiple paths, separated by a comma.
Alternatively, click Select Multiple Folders/Files from the drop-down:
This opens the Select File dialog:
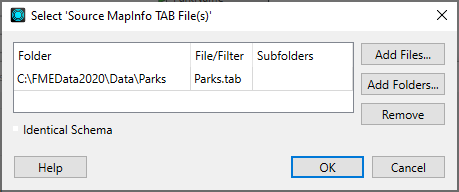
Add Files: Opens the file browser. You can select individual files, or Ctrl + click to select multiple files.
Add Folders: Opens the file browser so you can select entire folders to add to the reader. All files that are in the specified format in those folders will be included.
Remove: Removes the highlighted selection.
Subfolders: If there are subfolders below the initial dataset location, check the box to include them.
Identical Schema Check this box if you know that all the files have the same schema. This is a time-saving function: there will be no difference in the workspace results. If you know the files have the same schema, FME will not have to perform an initial scan of all the files to determine their schema. Instead, FME will take the first file as being representative of the data model.
Click OK to close the dialog, then OK to close Edit Parameter dialog and merge the selected files/folders with the original dataset. To see these results reflected in the Navigator view, float the cursor over the dataset name.
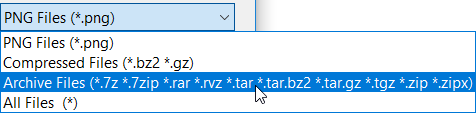
Supported archiving files: 7z, 7zip, rar (except v5), rvz, tar, tar.bz2, tar.gz, tgz, zip
Supported compression-only files: bz2, gz
Upon being read, the data is extracted and used just as if it were a normal dataset. FME is able to read data stored directly in an archive file, or within sub-folders.
Defining an archived dataset to be read is as simple as selecting that file from within any of FME’s dataset selection tools.
For example, when adding a reader:
- Select the Format.
- Click the Browse button to open the file browser. In the bottom right of the file browser, select Compressed Files or Archive Files from the filter list.
- Select the file in the file browser and click Open to add the dataset to the reader:
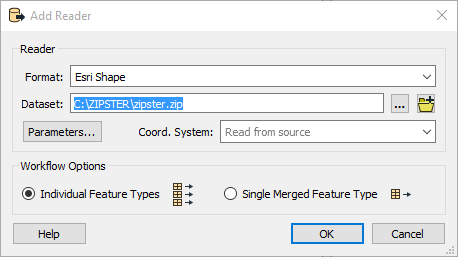
- Click OK to add the reader to the workspace
- To read all files of a specified extension at the top level, use [*.<extension>]. For example:
- To read all files of a specified extension at the top level and in folders beneath the top level, use [**\*.<extension>]. For example:
- To read all files of a specified extension that are nested two folders deep into an archive file:
C:\Data\shape-data.7z[*.shp]
C:\Data\shape-data.7z[**\*.shp]
C:\Data\shape-data.zip[*/*/*.shp]
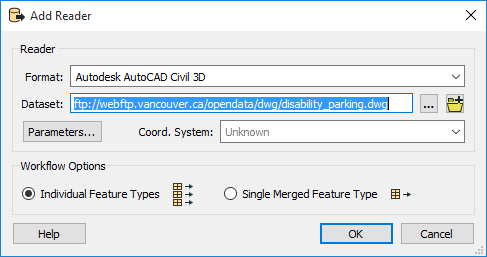
Another variation on a dataset location is the ability to read data from a URL.
Defining a URL dataset to be read is as simple as entering the URL into the Dataset field within any of FME’s dataset selection tools. After reading, the data will be downloaded and used just as if it were a normal dataset.
URL datasets can be read using either HTTP or FTP.
Note: FME cannot currently write data directly to a dataset defined by a URL. In this scenario, the data must be written out to the local file system, and then uploaded to the required location using a shutdown script or an HTTPFileUploader transformer.
To add a reader using a URL instead of a file location:
- Open the Add Reader dialog.
- Select the Format.
- Type or paste the URL of a dataset into the Dataset field.

Note: In the Reader parameters dialog for most formats, the parameter Use Network Authentication is visible when the dataset is a URL.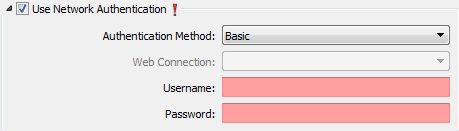
- Click OK to add the reader to the workspace.
Adding Writers
We can write to multiple destination datasets.
- From the menu, select Writers > Add Writer. Alternatively, use Quick Add.
- In the Add Writer dialog, specify the Format and Dataset. See Choosing from the Formats List. To output data to a zip file, click the zip output icon
 .
. - Specify Parameters and Coordinate System (if applicable). Note that you can set the output coordinate system for each dataset to its own unique coordinate system.
- Under Add Feature Type(s), select a Feature Type Definition option for the new writer:
- Automatic: Allows Workbench to define attributes and update them automatically based on which readers are connected in the workspace. The Feature Type dialog prompts you to set the Feature Type Name, Geometry (for some formats), and expose any format Attributes. Alternatively, right-click on the background of the workspace and select Insert Writer Feature Type. On the User Attributes tab, click Automatic.
- Manual: Allows you to create a new feature type manually. The Feature Type dialog prompts you set the Feature Type Name, Geometry (for some formats), and User attributes, as well as expose any format attributes. Alternatively, right-click on the background of the workspace and select Insert Writer Feature Type. On the User Attributes tab, click Manual.
- Copy from Reader: This option is available if the workspace already contains at least one reader. You are prompted to select one or more existing feature types. The new writer inherits the schema of the specified reader feature type(s).
- Import from Dataset: Imports the schema definitions of an external data source, which you are prompted to specify. You can then adjust the imported feature types so that they more closely reflect your dataset.
- Dynamic: Allows Workbench to determine schema definition at translation time, based on reader feature types. For more information, see About Dynamic Workspaces.
- None: Schema is ignored, and no feature types are added.
- Click OK. The log window displays processing information. A new Writer appears in the navigator view, and any new destination feature types appear on the Workbench canvas.
You can change the displayed name of a writer by right-clicking on it in the Navigator pane, and choosing Rename.
Tip: If you have multiple writers in your workspace, make sure that the writer that will be processing the most data is at the top of the list in the Navigator pane. This results in faster performance because the writer processes the features immediately upon receiving them, rather than having to cache them.
Writing to a Zip File
FME can write output datasets directly into a zip folder. This is useful for when the output needs to be compressed to a smaller storage size, or when a folder-based dataset (such as Esri Shapefile) is comprised of several files that need to be stored together.
Defining a zipped output dataset is as simple as setting a .zip extension in the output dataset name. For convenience, when the chosen format supports this feature, a Zip button  is displayed beside the Dataset parameter.
- Set the output format.
- Type the Dataset name with a
.zipextension, or click the Zip button:
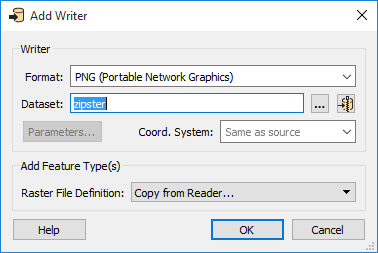
The Zip button automatically adds the .zip extension to the Dataset parameter.
![]()
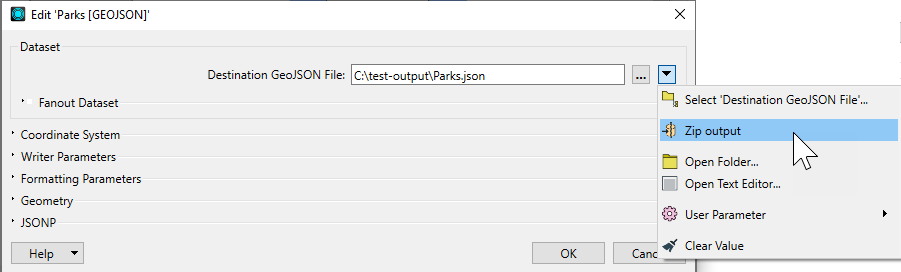
Existing Workspace Writer: Creating Zipped Output
- Locate and double-click the Destination dataset parameter in the Navigator window.
![]()
- Choose the Zip option. The option will appear either as a button on the dialog, or, if the dataset is linked to a user parameter, as an option in the parameter menu:
Performing Other Tasks with Readers and Writers
- Reorder: In the Navigator window, re-ordering the position of readers and writers changes the order in which Workbench processes them.
- Disable/Enable: Removes a reader, writer, or feature type from the workspace without actually deleting it. Disabled objects can be re-enabled. In the workspace, disabled objects turn gray.
- Removeor Delete: Deletes a reader, writer or feature type from the workspace.
- Open Containing Folder: Allows you to view files of datasets, feature types, and linked custom transformers in the Transformer Gallery.
To perform these tasks, Workbench provides a variety of tools to choose from. The options that are available depend on the tool, the object (reader, writer, or feature type), and the current position of the object in the workflow.
Context Menu (Navigator)
Click on a reader, writer, or feature type in the Navigator and right-click to display the context menu. For example, here is the menu when you right-click on a reader:

When we click on a reader or writer feature type on the canvas, a mini toolbar appears.
| Tool | Function |
|---|---|
 | Enable or disable the feature type. |
 | Enable or disable the reader or writer for the feature type (and all associated feature types). |
 | Edit parameters of the reader or writer for the feature type. |
 | Open the containing folder for the feature type. |
Menu Bar
On the menu bar, click Readers or Writers. For example, here is the menu when you click Readers:

The Generic Reader/Writer
The Generic Reader and Generic Writer allow FME workspaces to be freed from format restrictions.
Where all other readers and writers are tied to a specific format of data, the Generic Reader and Generic Writer are not. The Generic Reader is capable of reading almost any format of data, and the Generic Writer is capable of writing almost any format of data.
In that way, a single workspace can be used to process different data formats without being specifically set up for that format.
Overview
- Generic Reader: Allows translations and transformations to be completely specified, independent of input format. This is useful for solving problems when the input format is not known at design time.
- Generic Writer: Allows translations and transformations to be completely specified, independent of input or output format. This is useful for solving problems where the input format is known at design time, but the output format is not.
A Generic Reader is used in the same way as any other reader; by specifying the format in the Add Reader or Generate Workspace dialogs, or in Quick Add:

This source dataset is an AutoCAD DWG dataset, but FME does not know that yet. When the workspace is run FME examines the extension of the file chosen to determine this for itself.
At a later time the end-user might then choose a different file - in a completely different format - to be read, like so:
The Generic reader acts as a wrapper for the true reader which will be used when the translation is done. At run-time, once the actual reader is known, the Generic reader will do its best to represent the intention of the translation in the chosen input format.
At a later time the end-user might then choose a different file - in a completely different format - to be read, like so:

Again, at runtime FME examines the file extension to identify the format of data and then - having discovered it is MicroStation DGN - reads it just as if it were a true DGN reader.
That way a single reader can be made to read any format of data.
Tips:- Firstly this technique only works with file-based formats (it won't work on a database or web format). Secondly, the Generic Reader is not immune from the Unexpected Input Remover, so switching datasets - regardless of format - only works with a compatible schema
Generic Reader Feature Types
The Unexpected Input Remover is the function in FME that filters incoming data against the list of permitted feature types. If the incoming data is not defined in the workspace, then it is dropped from the translation.
In the previous example, traffic signals in the AutoCAD dataset were stored on a layer called "TrafficSignals", and the workspace names the reader feature type so. But, if the MicroStation file stored data on a different layer, then this would be the result:

All 778 records were dropped from the translation. So, although the Generic Reader allows you to read datasets of different formats, the limitation is that each dataset must have its layers defined as feature types in the workspace.
Of course, an easy way to allow all layers to pass is to set a Merge Feature Type in the Feature Type Properties:

With that setup, any layer of data can be passed into the workspace, regardless of format. Of course, even then we need to be careful about assuming what attributes will be available!
The Generic Writer
A Generic Writer is used in the same way as any other writer; by specifying the format in the Add Reader (or Generate Workspace) dialog:

There the destination dataset is specified as a folder. FME does not know the format to be written yet and so will not know whether it is file-based or folder-based.
The format required to be written can be specified by the author through a parameter when the writer is added:

Output format can also be set by the author in the Navigator window, or the end-user can specify it at runtime using an automatically created user parameter:

That way a single writer can be made to write any format of data, the format being chosen by the end-user at runtime.
Note:- Generic Readers and Writers by nature only deal with a flexible format, but can also be set up to be flexible with layers using a Merge Filter or Fanout.
However, each dataset being read must have the same attribute schema. Additionally, each dataset written receives an identical attribute schema. This part is not flexible.
Flexible attribute schemas require the use of either Automatic Attribute Definitions or a Dynamic Translation.
Fanouts
What is a Fanout?
A fanout is a tool applied to a writer or writer feature type in FME. They are a way for the workspace author to write data divided into groups of features.
Groups are defined by either the value of a single attribute or a string constructed from a combination of attributes and fixed strings. They can be written to separate feature types, or completely separate datasets.
Here an author is “fanning-out” a set of data into multiple outputs depending on a feature’s elevation attribute:

Because a fanout occurs as the data is written, it does not require multiple flows of data inside the workspace. Therefore this technique makes it easy to create groups with minimal impact on the workspace canvas.
Another significant benefit of a fanout is the high degree of flexibility – and freedom from fixed-layer schemas – in return for minimal effort.
There are two types of fanout: Feature Type Fanout and Dataset Fanout.
1) Feature Type Fanout
A Feature Type Fanout delivers data to multiple feature types (layers/tables) within a single dataset. Taking the elevation example, here the output is a different feature type for each elevation value:

The result of this fanout is a DXF dataset containing multiple layers of data.
Setting a Feature Type Fanout
A feature type fanout is not a specific setting. Instead it is defined by selecting an attribute for a writer feature type name, like so:

The Feature Type Name then changes to match what is selected:

In this case, each park record with a different neighborhood gets written to a different sheet of the Excel output spreadsheet. The Excel file will have a sheet named Downtown, a sheet named Kitsilano, and so on.
2) Dataset Fanout
A Dataset Fanout delivers data to the same feature type, but in multiple datasets. Using the elevation example again, here the output is a different dataset for each elevation value:

The result of this fanout is a series of DXF datasets, each of which has one elevation’s worth of contours on one layer.
Setting a Dataset Fanout
A Dataset Fanout is defined in the Navigator window in Workbench, just below the writer’s dataset parameter:

Double-clicking the Fanout Dataset parameter opens a dialog in which a Fanout checkbox is set. Here you can define the folder to write to and the Fanout Expression to use. The default values set the Fanout Directory from the destination dataset path, and the Fanout Expression from the destination dataset file name:

To achieve a fanout (a different file per attribute value) select an attribute to include in the file name, such as this:

In this case, each different neighborhood produces a separate file of park features.
It's important to note that the Text Editor dialog can be used to add different components to both the Fanout Directory and the Fanout Expression, including user parameters, functions, and datetimes. Generally, even if the requirement is to use an attribute to define a sub-folder, it would go into the Fanout Expression, rather than the Fanout Directory.
Combining Dataset Fanout and Zip Files
It's easily possible to both apply a fanout to a writer and zip (compress/archive) the files that are written. In fact there are several methods of doing so...
Fanout to a Single Zip File
By setting the Destination Fanout Directory as a zip file, it's possible to write multiple, fanned-out datasets, to a single zip file:

Here the user is fanning out to Shapefile based on the NeighborhoodName attribute. The output directory is set to a zip file meaning the output is a single zip file with multiple datasets. Because this is Shapefile format, each dataset is a folder containing a number of files (.shp, .shx, and so on).
Fanout to Multiple Zip Files
By setting the Fanout Expression with a zip file extension, it's possible to write multiple, fanned-out zip files, each containing a single dataset.

Here the user is also fanning out to Shapefile based on the NeighborhoodName attribute. The output directory is set to a plain directory, but the Fanout Expression is given a zip file extension. This leads to multiple zip files, one per dataset.
This sort of fanout is potentially useful when the output format includes multiple files (like Shapefile format) and you wish to handle the output some way, post-translation. It's also useful for large datasets (such as raster) where a single file can be way larger than its zipped equivalent.
Fanout to Multiple Zip Files inside a Single Zip File
By using both of the above techniques (in other words giving both the directory and the fanout parameters a zip file extension) you are able to write multiple zip files containing a single dataset, into a single zip file!

Here the output is a single zip file (Training.zip) containing a series of zipped dataset files!
Dynamic Translations
Dynamic Translations are a way to create "schema-less" workspaces.
What are Dynamic Translations?
The source and destination schema reflect the structure of the source data (what we have) and the structure of the destination data the user requires (what we want).
The layout of a dynamic translation does not reflect either the source or destination schema. It’s a universal layout that is designed to handle data regardless of the schema used by the source data.
Dynamic Readers
On the reader side of things, a dynamic workspace is very similar to using Merge Parameters; feature types are given free entry to a workspace, regardless of whether they are yet defined in there.
Data is also read regardless of attributes or geometry type.

Dynamic Writers
The writer side of a dynamic workspace mimics the reader part; feature types are written to the destination dataset, regardless of whether they are defined in the workspace.
Additionally, all attributes and geometries get written, regardless of whether they too have been predefined in a writer feature type.

Creating a Dynamic Translation
When an author creates a translation using the Generate Workspace dialog, there are two options for what is called workflow: Static Schema and Dynamic Schema.

The Static Schema option is the default for a workspace including schema. Choosing the Dynamic Schema option creates a schema-less workspace with dynamic readers and writers.
It is, however, possible to also create a workspace where only the readers are dynamic or only the writers...
Dynamic Reader Only
The Add Reader dialog has similar options for static and dynamic; however, in this case, we try to make them more user-friendly by labeling them Individual Feature Types and Single Merged Feature Type:

In essence, a dynamic reader is similar to just setting the Merge Feature Type option.
Dynamic Writer Only
The Add Writer dialog has options for how feature types and their attributes are defined. The most commonly used ones are Manual and Automatic. There is also an option that adds a writer in dynamic mode:

How Does a Dynamic Translation Look?
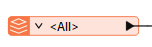
Both dynamic readers and dynamic writers each have a single Feature Type, regardless of the schema of the reader datasets:

Notice that there is only a single feature type, regardless of whether the data is made up of several layers or tables.
Also, notice that the sole reader Feature Type is named <All> (which provides a clue to what is happening here) and that the sole writer Feature Type is named <Dynamic>.
When the workspace is run, all of the source data is read through a single feature type. On the writer side, although there is only one output type, the data will be dynamically divided back into its component layers, keeping its original attributes and geometry type.
With this workspace, you can switch the source dataset to anything (in the correct format) and the output is a mirror image. There is no need to worry about unexpected input or unsupported geometry types. Plus, if you used the Generic Reader/Writer, it could read any dataset, of any format and create a duplicate output of it!
As the name suggests, a transformer is an FME Workbench object that carries out the transformation of features.
FME provides many different transformers to carry out different types of data operations.
Transformers are connected somewhere between the reader and writer feature types, so that data flows from the reader, through a transformation process, and on to the writer. Transformers appear in the canvas window as rectangular, light-blue objects.
Transformer Parameters
Each transformer may have many parameters (settings). Parameters can be accessed (like feature types) by double-clicking the transformer name or clicking the cogwheel icon:

Color-Coded Parameter Buttons
The parameter button on a transformer is color-coded to reflect the status of the settings.
A blue parameter button indicates that the transformer parameters were checked and amended as required and that the transformer is ready to use.

A yellow parameter button indicates that the default parameters have not yet been checked.

A red parameter button indicates that there is at least one parameter for which FME cannot supply a default value. The parameter must be provided with a value before using the transformer.

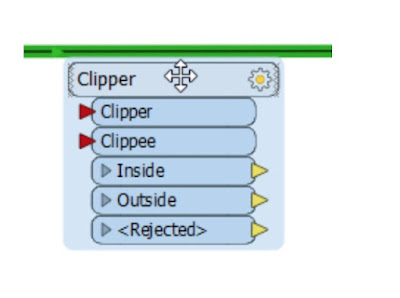
A transformer can have multiple input ports, multiple output ports, or both.
This 2DForcer transformer has a single input and output port.

This Clipper has multiple input and output ports. Notice that not all of them are – or need to be – connected.


Click on the drop-down arrow of a transformer output port to see all of the attributes that exit the transformer. This list includes all changes applied within the transformer.
Quick Add is the easiest way to add transformers, readers, and writers to the workspace. To try it, click on a blank area on the workspace canvas and press a key on the keyboard.
For example, type the letter a. When you press the key, a dialog appears on the canvas that contains a list of transformers whose names begin with a number or the letter a.
Search terms can be full or partial words:


Tip: If you add a transformer, then want to add the same transformer again, press the slash "/" key on your keyboard. The Quick Add box will appear showing the last selected transformer. Press the Return key to include it, then press Return again to edit its parameters.
About Quick Connect
Quick Connect is designed to help users author workspaces more easily than ever before. Instead of having to drag connections between different objects in the canvas, you can now connect them by simply clicking on the ports.
Although you can use this feature for all workspace connections, the most useful application for this functionality is when you have a large workspace and you need to make connections from one area to another. Usually you would zoom out until both areas are in view, but this could be difficult if the connection to be made is extremely large, or if the workspace is very dense. This feature lets you choose the source port, locate the area that you want to connect, then choose the destination port to complete the connection. For example, you can initiate Quick Connect, click a bookmark in the Navigator pane, and complete the connection once the workspace centers on the bookmark.
How to use Quick Connect
Click on any output port to be connected. A green circle highlights the port:

Move the cursor directly over the input destination port and click to set the connection.

To connect multiple ports, press the Ctrl key before you establish the first connection, then click additional input ports.
Drag and Insert
Using the Drag and Insert Transformer function is one of the easiest ways to insert and connect transformers into an existing workspace. It virtually eliminates the need to manually re-establish connections. This is especially useful in large workspaces, if you want to insert a transformer in the middle of many already established connections.
Inserting a Transformer: Existing Connection
You can "drag and insert" a transformer onto an existing connection. The connection will turn green.
You can manually connect transformers to a feature type, attribute, or another transformer by dragging the yellow arrow to the desired place. When the connection is placed, both arrows will turn green.
![]()
You can also connect a transformer by dragging it close to a connection port until you see a highlight, using the green triangle as a guide. The connection is set when you release the mouse button.
![]()
Junctions are a useful tool for managing connections as you build and organize a workspace. For example, you have five Creator transformers that you want to join before you proceed with building the rest of the workspace. You can create a Junction in the workspace that brings them together.
Junctions are also useful as a starting point when Running and Inspecting Part of a Workspace.
To insert a Junction using quick add, start typing 'Junction' on a blank spot on the canvas, and select 'Junction' when it appears. Junctions look like this when you add them:

Connect the elements of your workspace to the Junction as you would normally.
Inserting Junctions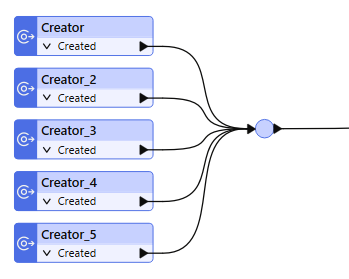
You can insert a Junction in a specific place in a workspace. Right-click on any input port, output port, or connector, and select Insert Junction.
Disabling Connections Using Junctions
You can disable a Junction, which disables all the connections that feed into it. Right-click on a Junction and select Disable. The connection turns a light gray color. To enable it, right-click and select Enable.
Transformers in Series
Much like a set of components in an electrical circuit, a series of Workbench transformers can be connected to have a cumulative effect on a set of features.
Even with the large number of transformers available in FME, users frequently need a combination - or chain of transformers - instead of a single one.
A string of transformers that graphically represent an overall workflow is a crucial concept of FME:

Transformers in Parallel
A stream is a flow of data represented by connections in the workspace. A key concept in FME is the ability to have multiple parallel streams within a workspace.
Multiple Streams
Multiple streams are useful when a user needs to process the same data but in many different ways. A workspace author can turn one stream into several, or combine several streams of data into one, as required:

Here an author is creating three data streams, each of which is processed separately then combined back into a single stream.

Creating Multiple Streams
Creating multiple data streams can occur in several ways. Sometimes a transformer with multiple output ports (a Tester transformer is a good illustration of this) will divide (or filter) data with several possible output streams:

Here data is divided into two streams, one of which is not connected to anything.
Additionally, a full stream of data can be duplicated by simply making multiple connections out of a single output port. This method creates a set of data for each connection:

 Here FME reads eight features but, because there are multiple connections, creates multiple copies of the data.
Disabling Transformers
You can temporarily disable a transformer to remove it from the translation. In most cases, you can still run the translation, and the workspace excludes these transformers.
Note: Especially for larger workspaces, it is sometimes better practice to disable connections.
Depending on the size of the workspace and the number of transformers, there are a few different ways to do this:
- Press the Ctrl key and click to select multiple transformers, or press the left mouse button and drag the cursor over a specific area.
- Right-click and select Disable or Disable Objects (for multiple-transformer selections).
-
The transformer color changes to gray (indicating that it is inactive) on the canvas:
![]()
The Transformers parameter in the Navigator shows the disabled transformers in the main transformer list.
![]()
The Navigator also adds a new Disabled Transformers object:
![]()
Re-enabling Transformers
- Navigator: Right-click on the disabled transformer in and select Enable.
- Canvas: Right-click on the transformer on the canvas and select Enable.
Most Valuable Transformers
If you have a thorough understanding of the most common transformers, then you have a good chance of being a very efficient user of FME Workbench.
The Top 30
The list of transformers on the Safe Software website is ordered by most-used, calculated from user feedback.
The following table (last updated March 2020) provides the list of the most commonly used 30 transformers. The Tester transformer is consistently number one in the list every year, highlighting its importance.
Rank | Transformer | Rank | Transformer |
1 | Tester | 16 | DuplicateFilter |
2 | AttributeCreator | 17 | FeatureReader |
3 | AttributeManager | 18 | StringReplacer |
4 | FeatureMerger | 19 | VertexCreator |
5 | Inspector | 20 | StatisticsCalculator |
6 | AttributeKeeper | 21 | SpatialFilter |
7 | TestFilter | 22 | Sorter |
8 | Creator | 23 | AttributeExposer |
9 | AttributeRenamer | 24 | Bufferer |
10 | Reprojector | 25 | Dissolver |
11 | Aggregator | 26 | GeometryFilter |
12 | AttributeRemover | 27 | ListExploder |
13 | AttributeFilter | 28 | FeatureJoiner |
14 | Clipper | 29 | AttributeSplitter |
15 | Counter | 30 | CoordinateExtractor |


No comments:
Post a Comment