

Introduction | Basic |
Introduction | - |
Getting Started | |
What is FME? | |
FME Desktop Components | |
FME Workbench | |
Exercise 1.1 | Similar skills as Exercise 1: Exploring FME |
Quiz |
What is FME?
FME stands as Feature Manipulation Engine, the data integration platform with the best support for spatial data worldwide.
FME was designed to overcome many of the problems associated with traditional translation methods.
Traditional translation is the lowest common denominator type of translation. Since there is a transfer of information from one schema to another, information can be lost. The information must map directly to the output schema; if it doesn't, it is often lost.
In the translation of CAD to GIS or GIS to CAD, traditional translation allows simple point-to-point or line-to-line translation. A line in CAD is translated into a line in ArcGIS. Since the data models differ between CAD packages and ArcGIS, there can be attributes from the line that are lost in translation. These important CAD attributes, such as tags or layer color, can be critical information in representing the features in the new data model. The only way to transfer these lost attributes when using traditional translation is to re-create the information in the new data model. This can be very time consuming and expensive.
Traditionally the software used to translate data to a different format had limited capabilities. Most of the data would be forced through a limited data model causing much of the meaning to be lost in translation. We call this a “thin-pipe translation”.

-> FME's data integration capabilities can be used to convert file formats, transform data, or do both simultaneously.
-> FME can also integrate complex spatial data.
-> It uses a graphical interface, so no coding is required.
Safe Software began in 1993. and its Head Quarter in Surrey, Canada.
Originally FME is an ETL (Extract Transform Load) tool, but in the current form it is a lot more than that.
Software Link : https://www.safe.com/support/downloads/#official
Free Student License Link : https://www.safe.com/free-fme-licenses/students/
FME Certification Detail : https://www.safe.com/partners/certification/fme-certified-professional/
Use the following form to manually retrieve a license file to activate your copy of FME Desktop : https://www.safe.com/activation/
History
Safe Software began in 1993, helping forestry companies exchange maps with the provincial government. It was technically possible to share the maps back then, but only after hours of manual work. Often, an incredible amount of information was lost in the process.
Nobody was happy. Safe Software created FME to address this problem and has been solving data challenges ever since. Today FME is the data integration platform with the best spatial support in the world, and it continues to expand what is possible by adding support for new data formats and workflows with each release.
What is ETL?
ETL (Extract, Transform and Load) can be described as a dataset tool that extracts data from a source, transforms it to fit the users’ needs, and then loads it into a destination or dataset.
FME was the first tool designed to be a spatial ETL application, focusing on translation of geographic data. Today, FME's ETL capabilities cover many different kinds of data, both spatial and non-spatial.
While an ETL tool must have processing capabilities for the various column types that are in a non-spatial database or system, a spatial ETL tool must also have the spatial operations – geoprocessing capabilities that change the structure and representation of spatial data – needed to move data from one spatial database or GIS to another.

- Extract data quickly from almost any source, regardless of its originating format and structure - including those for popular CAD, GIS and spatial database solutions
- Transform data easily into any format and structure required using repeatable workflows
- Load data seamlessly into the target system directly from FME and make it available exactly when, where and how it’s needed
What is Data Integration?
We define data integration as bringing “together data from disparate sources in a unified view to create a dataset with both valuable and usable information.”
Data Integration with FME
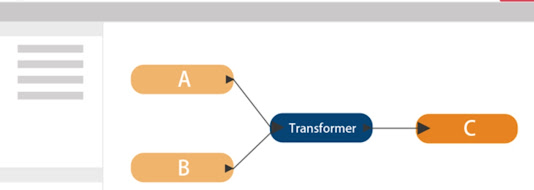
FME accomplishes data integration by reading data from multiple sources (in the graphic below, this is shown as sources A and B), using transformer tools to change or restructure the data to fit the users’ needs, and writing it to an output location (C).
How FME Works
At the heart of FME is an engine that supports an array of data types, formats, and applications: Excel, CSV, XML, and databases, as well as various types of mapping formats including GIS, CAD, BIM, and many more.
The capability to support so many data types is made possible by a rich data model that handles all possible geometry and attribute types.
FME has a number of key characteristics:
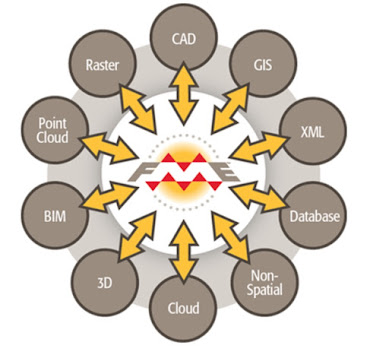
Centralized
FME is a central engine amongst a whole array of supported formats (right). Data can be read from any format and written to any other. This means adding support for a new format automatically adds support to convert that data to or from any existing format.
Semantic
FME has a rich data model designed to cover all possible geometry and attribute types. Data will not lose meaning as it is read. The only limitations are those inherent in the destination format, and, where possible, FME will automatically compensate to create a seamless translation process.
Thick-Pipe
FME provides tremendous transformation functionality, resulting in output that can be much greater than the sum of the inputs.


FME has helped thousands of customers worldwide leverage their data so it can be used exactly where, when, and how it’s needed. Many of our customers are in the following industries:
- Architecture, Engineering, & Construction
- Energy
- Federal Government
- Local Government
- Telecommunications
- Utilities
- FME Desktop lets we connect and transform data.
- For example, taking an Excel spreadsheet of business information and addresses and adding it to a MySQL database that is the backend to a citizen data access portal that allows searching for business license information.
- FME Server lets we automate workflows on-premises.
- For example, automatically retrieving data from a GIS layer to match incoming municipal business license applications, as well as sending an email to alert relevant stakeholders.
- FME Cloud lets we automate workflows in the cloud.
- For example, the city government could access FME Server technology in a fully hosted AWS cloud environment.


FME Components
Workbench has tools for defining the source and destination dataset structure (or schema), and also for manipulating the geometry and attributes of spatial data.
Workbench is fully integrated to interact with other FME applications (such as the FME Data Inspector). It is also integrated with other products such as FME Server, and is the authoring tool for FME Server models.
FME Workbench is a powerful tool for data conversion, sharing, transformation, validation, and integration.Workbench elements are represented graphically on the Workbench canvas , and saved as a workspace. By default, the workspace workflow reads from left to right: the reader (source data) is on the left, the transformers are in the center, and the writer (destination data) is on the right. Connections between each item represent the flow of data: connections can branch in different directions, and through different objects.

FME Quick Translator
FME Quick Translator (originally called the FME Universal Translator) was the first FME application to be developed. Translations are defined through a scripting language rather than a graphic interface. For this reason, the Quick Translator is largely superseded by FME Workbench; however, as its name suggests, it is good to use for quick, format-to-format translations.
FME Command-Line Engine
The FME Command-Line Engine enables translation requests to be submitted at the command-line level.
The FME Workbench user interface has many major components:

Canvas
The FME Workbench canvas is where you define the translation. It is the primary window within Workbench:

By default the workspace reads from left to right; data source on the left, transformation tools in the center, and data output on the right. Connections between each item represent the flow of data and may branch in different directions, merge together, or both.
Note that feature types and transformers appear on the canvas and the Navigator window, while readers and writers appear only on in the Navigator.
Menu/Toolbar
The menu bar and toolbar contain many tools: for example, tools for navigating around the Workbench canvas, controlling administrative tasks, and adding or removing readers/writers:
The Navigator window is a structured list of parameters that represent and control all of the components of a translation:

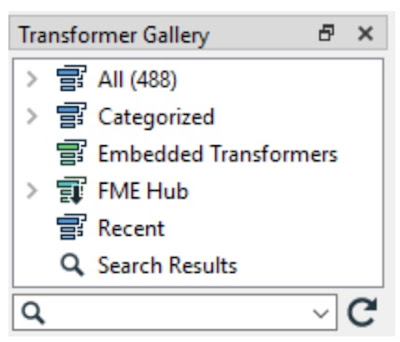
Transformer Gallery
The Transformer Gallery is a tool for the location and selection of FME transformation tools. The number of transformers (below, 488) will vary depending on the version of FME and any optional custom transformers installed:
Translation Log
The Translation Log reports on translations and other actions. Information includes any warning or error messages, translation status, length of translation, and the number of features processed:

Parameter Editor Window
The Parameter Editor window is for editing parameters for objects on the canvas window:

Visual Preview
Visual Preview is an embedded version of FME Data Inspector that displays features in a table or on a map. This window lets you track how your data is changing as you build your translation. Many of the features available in the stand-alone Data Inspector application are available in Visual Preview.

A workspace is the primary element in an FME translation and is responsible for storing a translation definition. The workspace is the container for all the functionality of a translation. It contains the following components:
Readers and Writers
A reader is the FME term for the component in a translation that reads a source dataset. Likewise, a writer is the component that writes to an output dataset.
Readers and writers are represented by entries in the Navigator window.
Feature Types
Feature type is the FME term that describes a subset of records. Common alternatives for this term are layer, table, sheet, feature class, and object class. For example, each sheet in an Excel workbook, table in a database, or layer in a spatial data file is defined by a feature type in FME.
Feature types are represented by objects that appear on the Workbench canvas.
Features
Features are the smallest single components of an FME translation.
They aren’t individually represented within a workspace, except by the feature counts on a completed translation.
Examples
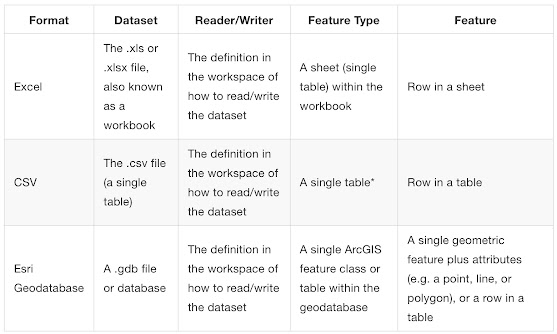
Here is a visual example using Excel. In the image below:
- Dataset = the XLS or XLSX file (a.k.a. the workbook)
- Feature types = the sheets (a.k.a. tables)
- Feature = the row (with columns as attributes)

Some examples are:
- In MicroStation Design File (DGN) format, each level is a Feature Type.
- In AutoCAD Drawing File (DWG) format, each layer is a Feature Type.
- In Smallworld format, each class is a Feature Type.
- In Esri Shapefile format, each file basename (*.shp file) is a Feature Type.
A Feature Type is contained within a dataset.
When we create a workspace using a dataset, the Feature Types present in that dataset are shown on the left-hand side of the workspace canvas:

Attribute:-Individual elements of a reader or writer feature type. In this example, the feature type is Zone and the attributes are Name, Owner, and Category. Relationships
Some examples are:
- In MicroStation Design File (DGN) format, each level is a Feature Type.
- In AutoCAD Drawing File (DWG) format, each layer is a Feature Type.
- In Smallworld format, each class is a Feature Type.
- In Esri Shapefile format, each file basename (*.shp file) is a Feature Type.
A Feature Type is contained within a dataset.
When we create a workspace using a dataset, the Feature Types present in that dataset are shown on the left-hand side of the workspace canvas:
Each workspace can contain multiple readers and writers, each of which can have multiple feature types, with multiple features. They exist in a hierarchy that looks like this:
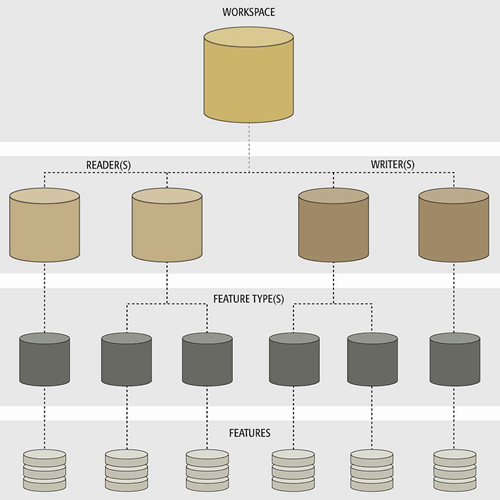
In Workbench
A workspace with multiple readers, writers, and transformers might look like this:

This workspace has two readers (each with three feature types), and three writers (with one, two, and one feature types). Each reader and writer is a different format, and each has a different name for its feature types.
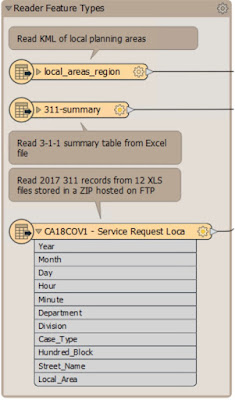
Examine the left-hand side of the canvas:
This area is where we read data. These objects are a KML (mapping data for Google Earth) of local planning areas, an Excel spreadsheet of summarized 3-1-1 call records, and an Excel spreadsheet of the records themselves.
Now look at the right-hand side:
This area is where we write data. The objects here represent the KML file of local planning areas, now with the 3-1-1 summary data added (311-local-areas) and a CSV file of the requests with an edited schema (311-requests).
In between the reader and writer are objects that transform data. They alter the structure (e.g., attribute names) and content (e.g., values of attributes) of the data as it moves from left to right.

Generate Workspace
Workbench’s interface makes it easy to set up and run a simple format-to-format ('quick') translation.
The Start Tab
The Start Tab in FME Workbench includes different ways to create or open a workspace. The simplest method is Generate Workspace:

You can also generate a workspace through File > Generate Workspace.

Generate Workspace Dialog
The Generate Workspace dialog condenses all the choices to be made into a single dialog box. It has fields for defining the format and location of both the data to be read, and the data to be written.

Red coloring in an FME dialog indicates mandatory fields. Users must enter data in these fields to continue. In most dialogs, the OK button is deactivated until the mandatory fields are complete.
Format and Dataset Selection
A key requirement is the format of the source data. All format selection fields in FME are both a pull-down menu and a text entry field.
The text entry field allows you to type a format name directly. It has an 'intelli-complete' function that selects close matches as you type.
The drop-down list shows some of the most commonly used formats, so many favourite formats are instantly available:

Click 'More Formats' and a table opens showing all of the formats supported by FME in the Reader and Writer Gallery.
The source dataset is another key requirement. Dataset selection fields are a text entry field, but with a browse button to open an explorer-like dialog for file selection.
Similarly, the Writer format and dataset are defined in this dialog:

Generate and Examine Workspace
Click OK to close the Generate Workspace dialog. FME Workbench generates a new workspace on the canvas:

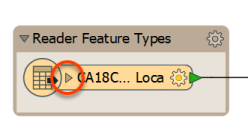
You can expose the list of attributes by clicking the arrow icon on each object:
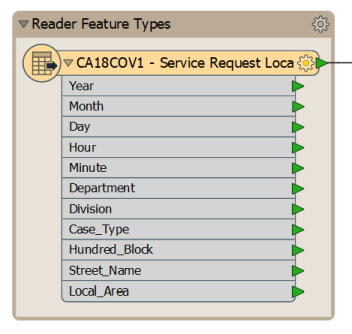
Now your reader feature type should look like this:
You can also expand the feature type to fit the entire name by hovering over its side until you get an expander arrow and then double-clicking:

Save Workspace
Save the workspace where ever you want. We will be using it in a later exercise. Remember there is a toolbar save button, and on the menu, there is File > Save As.
Tips:
When a translation is run immediately without adjustment it's known as a "Quick Translation." Because FME is a 'semantic' translator, with an enhanced data model, the output from a quick translation is as close to the source data in structure and meaning as possible, given the capabilities of the destination format.
Feature Types Dialog
However, whenever a source dataset contains multiple feature types, the user is first prompted to select which are to be translated.
This is achieved through the Select Feature Types dialog. Feature type is the FME term that describes a subset of records. Common alternatives for this term are layer, table, sheet, feature class, and object class. For example, each sheet in an Excel workbook, table in a database, or layer in a spatial data file is defined by a feature type in FME. Only feature types selected in the Select Feature Types dialog will be added to the workspace:

Here, for example, is a Select Feature Types dialog where the user has chosen to include all available layers in the workspace.
How to Run FME Workspace?
Before doing so, we want to control how to run the workspace. By default, a feature called Prompt for User Parameters is turned on. We don't need this on for this course, so let's turn it off by clicking the dropdown arrow next to the Run button the toolbar, and clicking Prompt for User Parameters:
Short Cut Key to run Workspace : F5

Now we are ready to run the workspace. Click on the green Run button on the Workbench toolbar:

The workspace will now run. As it does, you will see messages pass by in a log window. You may also see numbers appear on the canvas connections and green annotated icons on each object.
Locate and Examine Output
Once the translation is complete, click on the KML writer feature type named 311-local-areas. Choose the option Open Containing Folder:

Feature Caching
Sometimes it's important to be able to inspect data at any step of the translation. This behavior is activated using Run > Run with Feature Caching on the menu bar:

With this option active, FME generates caches at every step of the translation when the workspace is run:

The caches are indicated by the small icons on each object. In the above screenshot, the caches are green, but if any parameters change that could affect the data in the cache, they turn yellow. Yellow caches are considered invalid; you can still inspect them, but their data may no longer accurately represent the results of the translation.
| TIP |
| Be aware that caching data causes the translation to be slower, and to use system resources such as disk space. Data caching is very useful while developing a workspace, but should be turned off before putting a workspace into production. Inspecting Cached Data |
With Toggle Automatic Inspect on Selection enabled, if you click a feature type or transformer with a cache, it will automatically be displayed in Visual Preview
Specific data caches (for example a single output port on a transformer) can be inspected by clicking on the feature cache icon:
Inspecting data this way can allow you to quickly debug and develop workspaces, but keep in mind that if you are inspecting a large number of features or features with complex geometry, the caching required for automatic inspection might introduce performance challenges. |


No comments:
Post a Comment